The support for creating and moving external self-transitions in DevOps Model RealTime is currently a bit restricted. However, there are a few methods of doing this that work better than others.
Typically, you start by moving existing external self-transitions to make room for a new one on the border of a state symbol. If there is no room available on the state symbol border, resize the state symbol to make it larger. Resizing the state symbol can be done most of the time without affecting the layout of existing transitions that connect to the resized state symbol. Select the state symbol and resize it horizontally or vertically.
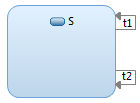
Consider an example where a state "S" with two external self-transitions "t1" and "t2" exists. Assume you want to add a new external self-transition "t3" on the right border of the state symbol, in between "t1" and "t2". Since there is no room for another external self-transition there, start by resizing the state symbol vertically:

Make space between "t1" and "t2" by moving "t2" down. If the transition connects to an entry and an exit point, the best way to move the transition is to select these connection points and move them with the mouse. You can select multiple entry and exit points to move several transitions at the same time. However, do not select the transition line itself, as this makes it hard to move the transition and could also result in accidentally disconnecting the line from the entry or exit points. You can also move an external self-transition by selecting the entry and exit points and then use the arrow keys for moving it. However, if the transition needs to be moved past an existing external-self transition, the arrow keys cannot do this so in that case you have to use the mouse instead.
If, as in the above example, the external self-transition connects directly to the state symbol and not to entry or exit points, the best way to move it is to select the transition line and press the arrow keys. You can also move it by first moving the start point of the transition and then the end point afterwards.
Here is what the state symbol looks like after you have moved "t2" down by first moving the start point of the transition and then the end point:

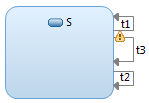
Next create a new external self-transition. Select the transition in the state chart diagram editor palette and click on the state symbol. Click the state symbol near the point where you want the new external self-transition to be added. In our example we click on the state symbol somewhere between the two self-transitions, to create a transition "t3" there:

If the new transition appears in a different location on the state symbol, it is because the editor could not fit the new transition near the point where you clicked. In this case, you have to move the transition to the wanted position afterwards, by following the steps for transition movement described above.